Way back when, I originally I used a SmartPhone app with an external GPS unit for data acquisition but soon after upgraded to an AiM Solo 2 DL. Since moving to the AiM equipment, several riding friends have done the same. Here I’ll share some of the things I do to automate and simplify data acquisition. Reflecting on what I’m going to mention comes largely influenced by my day job in IT where I try to automate whatever I can, make it reliable and almost appliance-like.
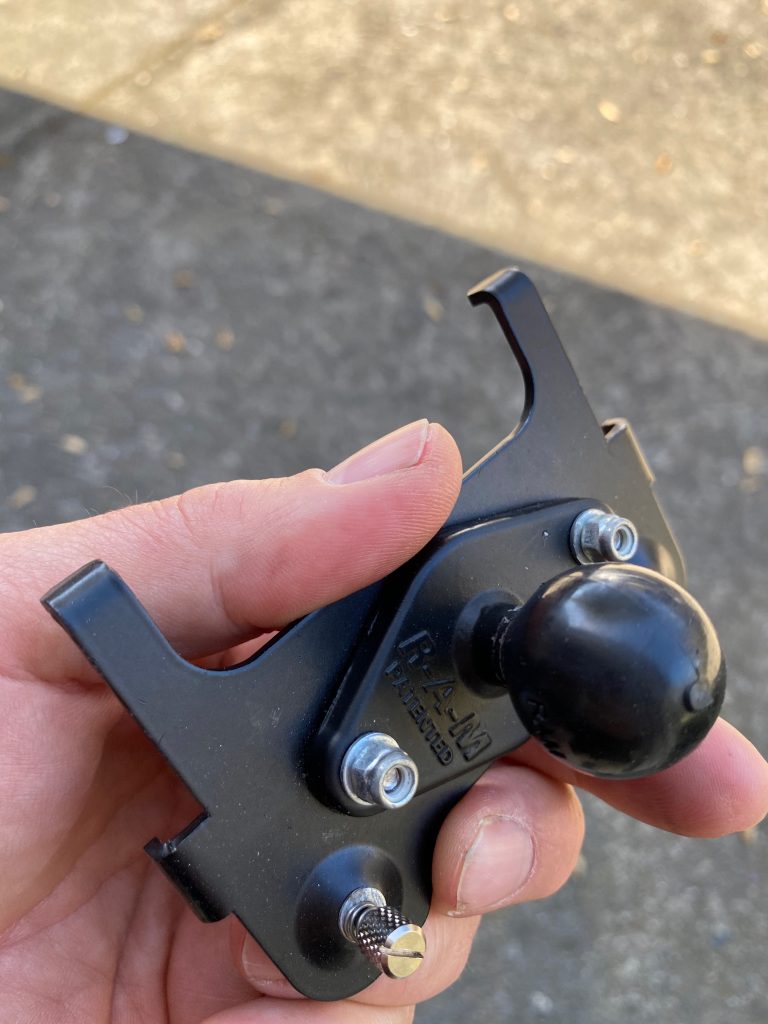
- Mount it properly – This means using the included mounting bracket. Mount that bracket solidly and then you can easily remove the lap timer from the bracket for storage, charging, review, etc. You can buy extra mounting brackets (~$15) if you have more than one bike or alternatively, use a RAM mount ball screwed into the back of the AiM bracket (that’s what I do with my now-repurposed Solo 2 DL, I use it on my street bike when it goes to the track and my mini-motos when I take them to the kart tracks). On my race bike, I fabricated a simple aluminum plate to which I mounted the Solo 2 bracket and still had a spare bracket when I went to the kart track with my mini-moto. Images at the end. You might also check with Sportbike Track Gear, Wicked Racing, Graves, etc. to see if they have a mount specific to your bike.
- Power it from your bike – it sucks to have your session come up and you’re ready to put in a burner and your lap timer is dead. AiM sells various harnesses and it’s easy enough to tap into an existing switched power circuit (which you definitely want, otherwise you may find your Solo is fully charged but your bike’s battery is dead). I like to use a headlight or any accessory circuit that comes on with the ignition. Another benefit of it being on a switched circuit is that the timer will automatically power on when you fire up the bike (one less thing to think about) and turn off after the preset time after the ignition is turned off (usually 15 min). This applies mostly to the non-DL version (there isn’t any benefit to the extra $ for the DL if you aren’t connecting to your bike’s ECU). Another bonus from wiring it to the bike is that the cable serves as a tether in case the bracket comes loose.
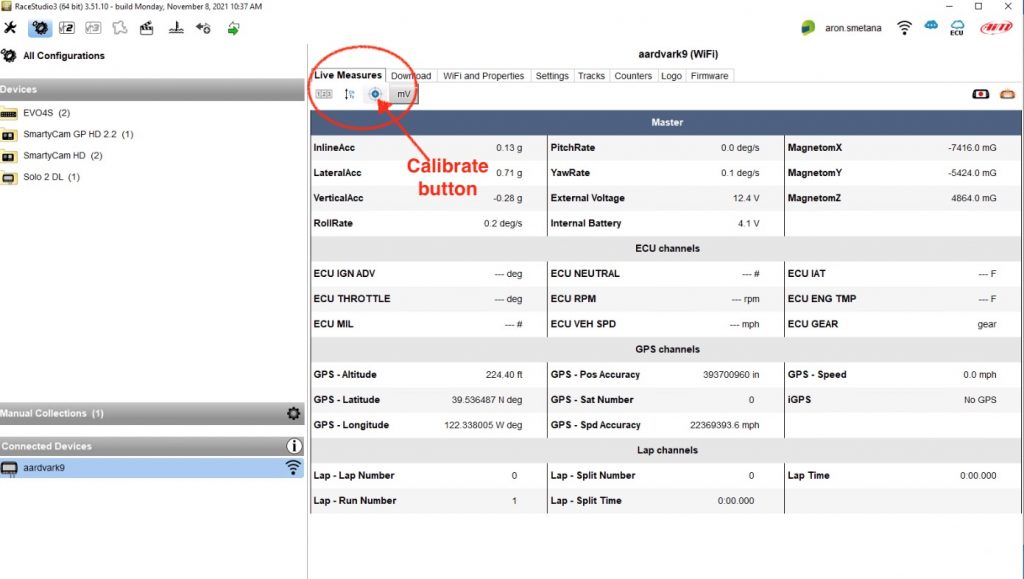
- Keep things patched – Again, the real power of the AiM hardware is the data analysis capabilities. You need to connect to it with your PC to pull the data and use Race Studio 3 or 3-beta software. Most models can be calibrated as well. This will give you more accurate lateral and longitudinal data. While you’re there, also check for any firmware updates and map updates and transfer them to the AiM device. I usually do this one or two days before my track day or race. See image at the end for the area in the software of where to calibrate.
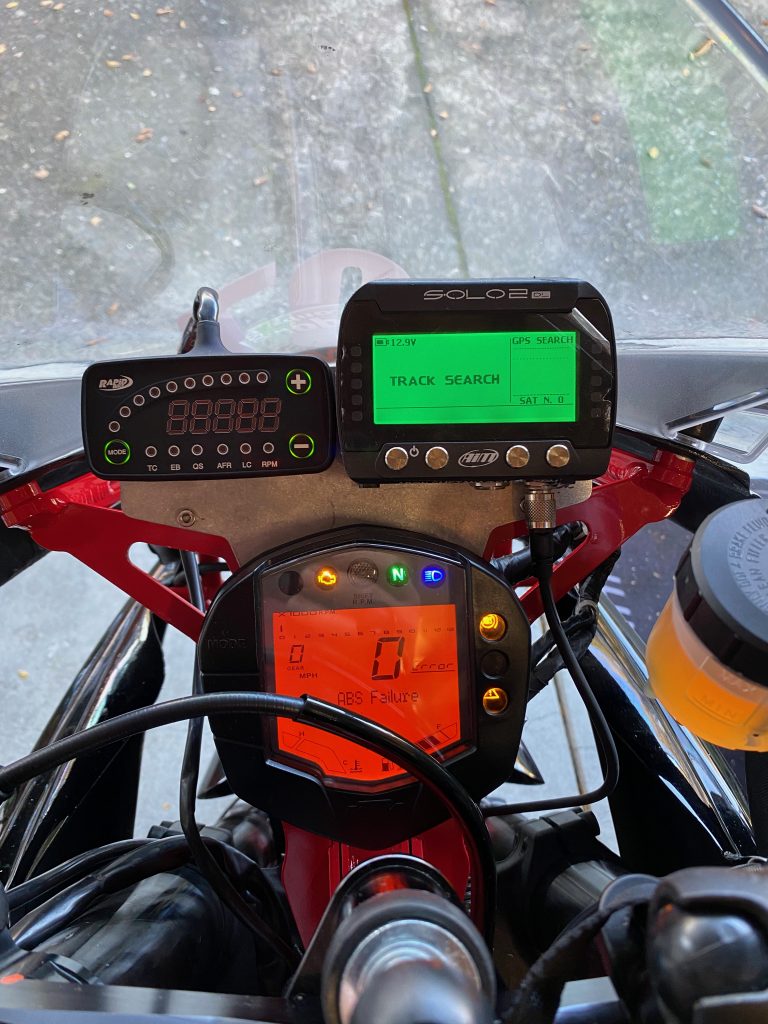
- Connect to your bike – If you have a DL (data logger) version of the AiM Solo, make sure you have the correct ECU profile and test it ahead of time. I did this by creating additional ‘pages’ in the RaceStudio 3 software for my Solo 2. I have a page for just lap time (current), a couple different pages for session/lap times, but for this purpose, another page showing engine RPM, throttle position sensor (TPS), brake pressure, and gear position. This way it’s a quick check to make sure that the Solo is picking up those measures from the bike.
- Get familiar with the software – it’s powerful stuff, professional race teams use this gear. Even looking at just GPS speed (aka speed trace) will help you find opportunities. AiM has a huge library of videos on YouTube where you can spend literally days learning how to make the most of the software. James Colborn has put together a lot of nice bite-sized videos on it too. Don’t get too buried in math channels and external sensors yet, just start by focusing on the speed trace.
- Consider a dedicated computer – I know, it’s yet another significant cost. I know some people use virtualization or dual boot their Macs but it can be a hassle. I generally recommend a refurbished or used Windows laptop, preferably a business class computer that can be upgraded if need be. I also use mine for my automotive diagnosis software (also Windows-only). I know several people who have bought refurbished business laptops for less than $500 and they are totally sufficient for running the AiM software.
- Even a GoPro can be a good tool – One of the more helpful things I discovered early on in evaluating my own riding was using a GoPro camera with the GPS enabled. It goes through batteries much faster but I was able to use the G-force & speed displays in the GoPro editing software after the fact. It’s rather rudimentary but it was helpful. I knew that 1.0G in longitudinal acceleration meant the front lifts and -1.0G deceleration was approximately where the rear would start to lift so I was working toward maximizing my braking and acceleration just using those measures. Again, not the optimal tool but if you already have a GoPro and aren’t ready to get into more data, it’s not a bad way to start.
- Overlay Videos – If you want to do those cool overlays on your video (using something like Race Render) with data and lap times, it’s a bit of a hassle to export your AiM data, line it up with the video, then render. I instead bought the Solo 2 DL version which has the ability to work directly with AiM’s SmartyCam, which will provide an automatic overlay with current lap time and best lap time as well as different displays for tachometers, speedometers, throttle position, brake pressure, etc. (assuming you have these in your data feed from the bike). It’s an expensive camera but as they say, time is money and I burned out doing the RaceRender videos. I’ve also found that they are FAR more reliable than GoPro cameras and it costs a little more than 2 current GoPro cameras and some extra batteries, the latter of which which seem to fail on me at the most inopportune times after a couple of years. I used to bemoan the video quality of the SCHD compared to the GoPro, however once you get over that, you’ll find the resolution acceptable and you’re not using the video to show off to your friends so it becomes less of a concern. Yeah, I wish the video quality were better on the SCHD, but automatic overlays and reliability are far more valuable to me.
- AiM Race Studio 3 – beta – AiM’s software version numbers and names can be confusing. In sum, just bite the bullet and use Race Studio 3 – beta version. Use this to download your session data. Race Studio is the suite of software, under that umbrella they have 2 different version of ‘Race Studio Analysis‘, version 2 and version 3. Race Studio Analysis v3 is presently (late 2021) in beta still. Most of it works well but most people are still using Analysis version 2. Now the reason to use Race Studio 3 – beta is so that all your imported data will be available in both Analysis 2 and 3. Even if you don’t intend to jump to Analysis 3 for a while, at least when you do the data will be there.
- Back it up! – Once you’ve downloaded your session data to your computer, back it up somewhere secure–this can be a cloud service, a server at home, a thumb drive you know you won’t lose, etc. Just make sure you have a copy of it so it doesn’t only live on your track computer.